The Stihl Service Manual is a comprehensive guide designed to help users maintain and repair their equipment effectively. It provides detailed instructions, safety precautions, and parts diagrams to ensure optimal performance and longevity of Stihl products.
1.1 Overview of the Stihl Service Manual PDF
The Stihl Service Manual PDF is a detailed digital document designed to assist users in maintaining, repairing, and troubleshooting their Stihl equipment. It includes comprehensive guides, parts diagrams, and specifications for various models, ensuring proper handling and safety. The manual covers chainsaws, trimmers, and other equipment, providing essential information for DIY repairs and professional servicing. It’s a valuable resource for extending the lifespan of your Stihl tools.
1.2 Importance of Using the Service Manual
Using the Stihl Service Manual is crucial for ensuring safety, proper maintenance, and efficient repairs. It provides detailed guidelines, troubleshooting tips, and parts diagrams, enabling users to handle their equipment correctly. The manual helps extend the lifespan of Stihl tools and ensures compliance with manufacturer recommendations, making it an essential resource for both professionals and DIY enthusiasts.
Where to Find the Stihl Service Manual PDF for Free
The Stihl Service Manual PDF can be freely downloaded from official Stihl websites, trusted third-party platforms, or forums specializing in power tools and equipment maintenance.
2.1 Official Stihl Websites and Resources
Stihl’s official website offers a dedicated section for service manuals, providing free PDF downloads for various models. These resources are tailored for specific products, ensuring accuracy and reliability. Users can access detailed guides, safety information, and parts diagrams directly from the manufacturer. Official Stihl portals are the most trustworthy source for manuals, as they are regularly updated and verified for authenticity and completeness.
2.2 Reliable Third-Party Websites for Download
Several third-party websites offer free downloads of Stihl service manuals, such as ManualsLib, ManualsOnline, and WorldofTrainz. These platforms provide access to comprehensive guides, parts diagrams, and repair instructions for various Stihl models. While these sites are convenient, ensure the manual is authentic and compatible with your specific model. Always verify the source to avoid downloading incorrect or outdated information, ensuring safety and accuracy in repairs.
How to Download the Stihl Service Manual
Downloading a Stihl Service Manual involves visiting official or trusted third-party sites, selecting your model, and clicking the download link. Ensure compatibility and security during the process.
3.1 Step-by-Step Guide to Downloading the Manual
To download the Stihl Service Manual, visit the official Stihl website or a reliable third-party site. Navigate to the support or download section, select your model from the list, and click the download link. Ensure your device has enough storage and that the file is in PDF format for easy access. Always verify the source to avoid malicious files and ensure a safe download process.
3.2 Tips for Ensuring a Safe and Secure Download
Always download the Stihl Service Manual from official Stihl websites or trusted third-party sources to avoid malicious files. Use antivirus software to scan the download before opening. Ensure the website URL starts with “https” for a secure connection. Avoid downloading from unverified or suspicious sites, as they may contain harmful content. Verify the file format is PDF for compatibility and reliability. This ensures a safe and secure downloading experience.

Models Covered in the Stihl Service Manual
The Stihl Service Manual covers various models, including chainsaws like 021, 023, 025, and other equipment such as FS94, KM94, and SP92, ensuring comprehensive support.
4.1 Popular Chainsaw Models (021, 023, 025)
The Stihl Service Manual covers popular chainsaw models like the 021, 023, and 025, providing detailed repair and maintenance instructions. These models are known for their reliability and performance, and the manual ensures users can troubleshoot and fix common issues, such as engine problems and fuel system maintenance, with ease. It also includes diagrams for accurate parts identification and replacement.
4.2 Other Equipment Covered (FS94, KM94, SP92)
The Stihl Service Manual also covers other equipment such as the FS94, KM94, and SP92 models. These manuals provide detailed maintenance and repair instructions specific to these units, ensuring users can address issues efficiently. They include troubleshooting guides, parts diagrams, and repair procedures, making it easier to keep equipment in optimal condition. This comprehensive coverage ensures all Stihl products receive the care they need for long-term performance and reliability.

Safety Precautions in the Service Manual
The Stihl Service Manual includes detailed information for models FS94, KM94, and SP92. These guides provide specific maintenance and repair instructions, ensuring proper care for each unit. They cover troubleshooting, parts diagrams, and repair procedures, making it easier to maintain equipment performance and longevity. This section is essential for users needing precise guidance for these models.
5.1 Essential Safety Guidelines for Users
The Stihl Service Manual emphasizes wearing protective gear, including gloves, safety glasses, and sturdy footwear. It advises users to ensure proper tool handling, avoid loose clothing, and keep work areas clean. The manual also stresses the importance of following safety precautions to prevent accidents and injuries. Adhering to these guidelines ensures safe and effective operation of Stihl equipment, minimizing risks during maintenance and repair tasks.
5.2 Recommended Cutting Techniques
The Stihl Service Manual outlines proper cutting techniques to ensure efficiency and safety. It recommends maintaining a firm grip, using the correct stance, and aligning the chainsaw for precise cuts. Techniques include boring, snip, and pull cuts, emphasizing chain sharpness and proper angle usage. These methods minimize kickback risks and optimize performance, ensuring safe and effective results for various cutting tasks and materials. Proper technique enhances both safety and productivity.

Maintenance and Repair Instructions
The Stihl Service Manual provides detailed maintenance and repair guidelines, including routine checks, engine tuning, and fuel system cleaning. It ensures proper equipment function and longevity.
6.1 Engine and Fuel System Maintenance
The Stihl Service Manual provides detailed instructions for maintaining the engine and fuel system. Regular checks of the air filter, fuel lines, and carburetor ensure optimal performance. Cleaning or replacing these components as specified prevents engine issues. Proper fuel mixture ratios and spark plug maintenance are also emphasized to avoid engine damage and ensure efficient operation. Adhering to these guidelines extends the lifespan of your Stihl equipment and maintains its reliability.
6.2 Ignition System Repair and Troubleshooting
The Stihl Service Manual offers detailed guidance for repairing and troubleshooting the ignition system. It outlines steps to inspect and replace spark plugs, ensuring proper gap settings. Faulty ignition coils or modules are diagnosed through specific tests. Cleaning or replacing the ignition module and spark plug boot is also covered to restore proper engine operation. These procedures help prevent misfires and ensure reliable engine performance, extending the equipment’s service life effectively.

Parts Diagrams and Identification
The Stihl Service Manual includes detailed parts diagrams, enabling users to identify components easily. These diagrams guide repairs and maintenance, ensuring accurate part replacement for optimal performance.
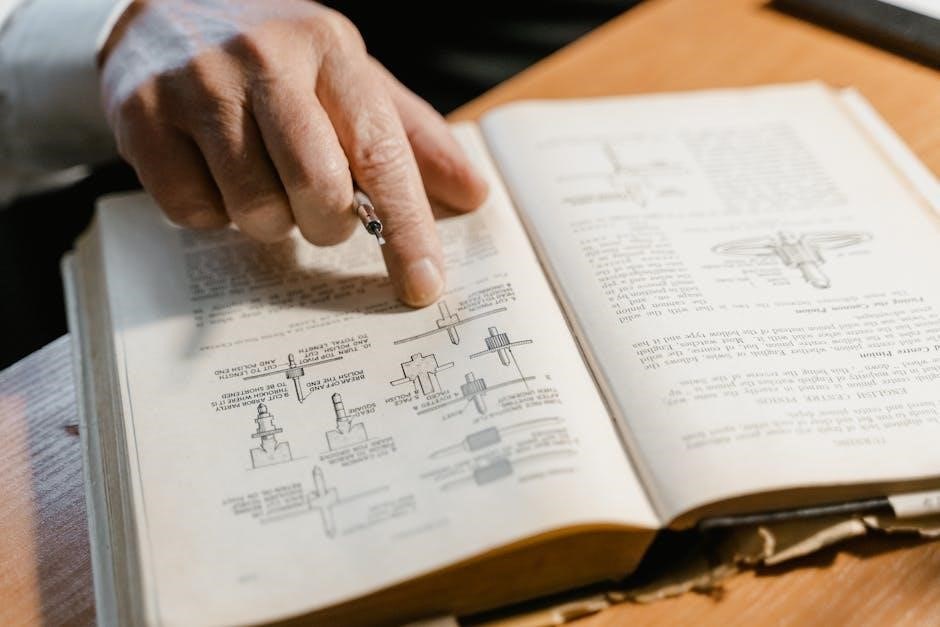
7.1 Understanding Parts Diagrams for Easy Repair
The Stihl Service Manual includes detailed parts diagrams that simplify repair processes. These visual guides help users identify components, understand their assembly, and locate specific parts for replacement. By referencing these diagrams, users can accurately diagnose issues and ensure proper maintenance. The diagrams cover various models, including chainsaws and trimmers, making it easier for users to find and order the correct parts. This feature enhances repair efficiency and reduces downtime, ensuring equipment longevity and performance.
The diagrams are organized by model, with clear labels and exploded views, allowing users to visualize how components interact. This feature is particularly useful for DIY enthusiasts and professionals alike, as it minimizes errors during repairs. The manual also provides part numbers, enabling users to source replacements directly from Stihl or authorized dealers.
Understanding these diagrams empowers users to tackle repairs confidently, ensuring their equipment operates at peak performance. The combination of detailed visuals and part information makes the Stihl Service Manual an indispensable resource for anyone maintaining or repairing their tools.
By leveraging the parts diagrams, users can avoid costly mistakes and extend the lifespan of their equipment. The clear and concise layout of the diagrams ensures that even complex repairs are approached with clarity and precision; This makes the manual a valuable tool for both routine maintenance and unexpected fixes;
Overall, the parts diagrams in the Stihl Service Manual are designed to streamline the repair process, providing users with the confidence and knowledge to keep their equipment running smoothly.
7.2 Locating Parts for Your Specific Model
To locate parts for your Stihl equipment, refer to the model-specific sections in the service manual. Each model, such as chainsaws or trimmers, has a dedicated parts list with corresponding numbers. Use these numbers to identify and source the correct components from Stihl dealers or authorized retailers. This ensures compatibility and avoids errors during repairs. The manual also provides guidance on where to find parts diagrams for accurate identification and ordering.
By matching part numbers to your specific model, you can ensure proper fitment and functionality. This streamlined process helps users avoid purchasing incorrect parts, saving time and resources. The manual’s organized structure makes it easy to navigate and find the exact parts needed for your equipment.
Additionally, the service manual often includes links or references to Stihl’s official parts catalog, further simplifying the process. This ensures users can quickly access the necessary components to maintain or repair their tools effectively.
Overall, the manual’s detailed parts lists and model-specific guidance make it an essential tool for anyone looking to locate and replace parts accurately. This feature enhances the overall repair experience and ensures equipment longevity.
By leveraging the manual’s resources, users can efficiently find the right parts for their Stihl equipment, minimizing downtime and ensuring optimal performance. The clear instructions and organized format make the process straightforward, even for those new to repairs.
The manual’s focus on model-specific parts ensures that users can quickly and accurately identify what they need, streamlining the repair process and reducing frustration. This level of detail makes the manual an indispensable resource for Stihl equipment owners.
By following the manual’s guidance, users can extend the life of their tools and keep them functioning at their best. The ability to locate parts efficiently is just one of the many benefits offered by the Stihl Service Manual.
The Stihl Service Manual’s focus on model-specific parts ensures that users can quickly and accurately identify what they need, streamlining the repair process and reducing frustration. This level of detail makes the manual an indispensable resource for Stihl equipment owners.
By following the manual’s guidance, users can extend the life of their tools and keep them functioning at their best. The ability to locate parts efficiently is just one of the many benefits offered by the Stihl Service Manual.

Troubleshooting Common Issues
The Stihl Service Manual provides detailed troubleshooting guides for common issues like engine problems and fuel system malfunctions, offering step-by-step solutions to restore optimal performance.
8.1 Diagnosing and Fixing Engine Problems
The Stihl Service Manual offers detailed guidance for diagnosing and repairing engine issues, such as faulty ignition systems or carburetor malfunctions. It provides step-by-step instructions to identify the root cause of engine problems, ensuring precise and effective repairs. By following the manual, users can address common issues like poor engine performance or failure to start, restoring their equipment to optimal functionality. Safety guidelines and parts diagrams are included to aid in successful troubleshooting and repair.

and Final Thoughts

8.2 Solving Fuel and Ignition System Issues
The Stihl Service Manual provides expert guidance for resolving fuel and ignition system problems. It outlines step-by-step procedures for diagnosing issues like clogged fuel lines, faulty spark plugs, or malfunctioning carburetors. The manual includes detailed troubleshooting charts and repair instructions to ensure proper functionality. By following the recommended steps, users can restore their equipment’s performance and prevent future issues. Clear diagrams and safety tips are also included for accurate and secure repairs.