i-Pilot Remote Control Manual: A Comprehensive Guide
This comprehensive guide details the i-Pilot system, covering installation, operation, troubleshooting, and maintenance for optimal GPS motor control and navigation experiences.
The i-Pilot system represents a significant advancement in boat control technology, offering anglers and boaters unprecedented precision and convenience. This innovative GPS motor control system, detailed within this manual, allows for effortless navigation and station-holding capabilities. It’s designed to simplify your time on the water, enhancing both fishing and recreational boating experiences.
This manual is structured to guide you through every aspect of the i-Pilot system, from initial installation and setup to mastering advanced features like Spot-Lock and AutoTrack. Whether you’re a seasoned boater or new to GPS-enabled motor controls, this resource will provide the knowledge needed to fully utilize the i-Pilot’s potential.
What is i-Pilot?
i-Pilot is Minn Kota’s revolutionary GPS motor control system, designed to provide anglers and boaters with unparalleled control and precision on the water. It seamlessly integrates GPS technology with your trolling motor, enabling features like automatic boat control, waypoint navigation, and precise speed management.
Essentially, i-Pilot transforms your trolling motor into a smart system, allowing you to effortlessly maintain position, follow pre-set paths, or navigate to specific fishing spots. This system eliminates the need for constant manual adjustments, freeing you to focus on enjoying your time on the water and maximizing your success.
Key Features and Benefits
i-Pilot boasts several key features, including Spot-Lock technology for maintaining position even in wind and current, AutoTrack which allows following a pre-defined path, and precise speed control. The system also offers waypoint management, enabling saving and returning to favorite fishing locations.
Benefits include increased fishing efficiency, reduced angler fatigue, and enhanced boat control. i-Pilot simplifies navigation, allowing users to focus on angling rather than maneuvering. The intuitive remote interface and easy-to-use features make it accessible for both novice and experienced boaters, maximizing enjoyment on the water.

Installation Guide
This section provides a detailed, step-by-step process for installing the i-Pilot module, ensuring proper connection and antenna positioning for optimal performance.
Pre-Installation Checklist
Before beginning the i-Pilot installation, carefully review this checklist to ensure a smooth and successful setup. First, confirm compatibility with your Minn Kota motor model. Verify you have all necessary components, including the i-Pilot module, antenna, and mounting hardware.
Ensure the motor is disconnected from the power source. Locate a suitable, dry location for the module, protected from extreme temperatures and direct water exposure. Download the guided installation video from minnkotamotors.com for visual assistance. Finally, have the owner’s manual readily available for reference during the process, and note the customer service number: 1-800-227-6433.
Step-by-Step Installation Process
Begin by mounting the i-Pilot module securely in the pre-selected location, ensuring proper cable routing. Connect the module to the motor’s wiring harness, carefully matching the color-coded wires. Refer to the installation video on minnkotamotors.com for detailed visual guidance.
Next, securely attach the antenna, ensuring it has a clear view of the sky for optimal GPS signal reception; Double-check all connections for tightness and proper insulation. Finally, before powering on, review all steps to confirm accuracy. If unsure, consult the owner’s manual or contact Minn Kota technical support at 1-800-227-6433.
Connecting the i-Pilot Module
Carefully connect the i-Pilot module to your trolling motor, ensuring a secure and waterproof connection. Match the color-coded wires precisely – typically, these include power, ground, and communication lines. A proper connection is crucial for reliable operation.
Inspect the wiring harness for any damage before connecting. Utilize dielectric grease on the connections to prevent corrosion. Refer to the detailed diagrams in the owner’s manual or the online installation video for specific wiring configurations. If you encounter difficulties, contact Minn Kota’s technical service at 1-800-227-6433 for assistance.
Antenna Installation and Positioning
Optimal antenna placement is vital for strong GPS signal reception with your i-Pilot system. Mount the antenna in a clear, unobstructed location, away from the boat’s hull, motor, and other electronic devices. Ensure a secure mounting point to prevent movement during operation.
Avoid areas with potential interference, like metal structures or enclosed spaces. The antenna should have a clear view of the sky. Refer to the manual for recommended mounting height and angle. Proper positioning maximizes accuracy and reliability of the GPS features, including Spot-Lock and AutoTrack.
Getting Started with i-Pilot
Begin your i-Pilot journey by powering on the system, pairing the remote, and familiarizing yourself with the display interface for seamless control.
Powering On and Initial Setup
Initiating the i-Pilot system requires a straightforward power-on sequence. Ensure the motor is properly connected to a fully charged battery. Press the power button on the remote control; the display screen will illuminate, indicating the system is active.
During the initial setup, the remote may prompt you to select your preferred language and units of measurement (feet or meters). Follow the on-screen instructions carefully to complete this process. It’s crucial to ensure a strong GPS signal is acquired before proceeding.
Allow the i-Pilot system a few moments to establish a connection with the motor and acquire satellite data. A successful connection is typically indicated by a stable GPS icon on the display.
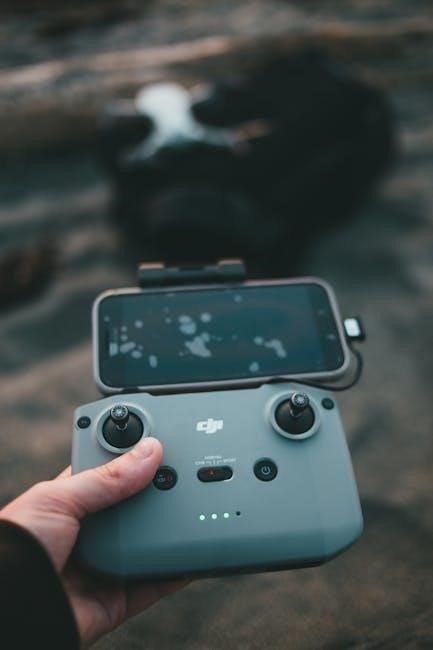
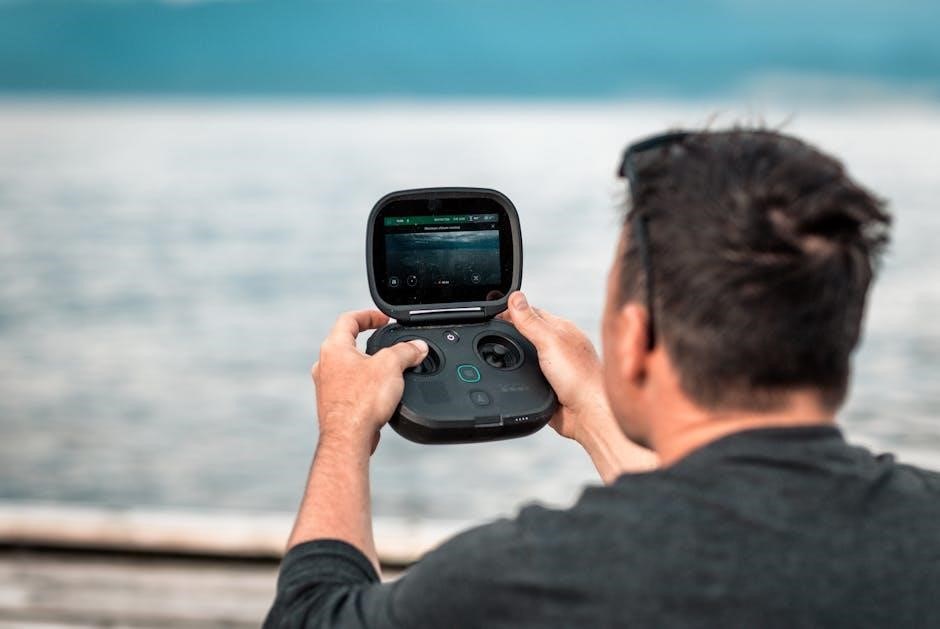
Remote Control Overview
The i-Pilot remote control features an intuitive layout designed for ease of use on the water. Key components include a power button, a full-color display screen, directional buttons for steering, speed control buttons, and dedicated buttons for accessing advanced features like Spot-Lock and AutoTrack.
A central dial allows for precise speed adjustments, while the menu button provides access to system settings and waypoint management. The remote is designed to be waterproof and durable, ensuring reliable performance in marine environments. Familiarize yourself with the button layout before your first outing.
Understanding the Display Interface
The i-Pilot display presents crucial information clearly. The main screen showcases speed, heading, battery voltage, and GPS signal strength. Icons indicate active features like Spot-Lock or AutoTrack. Navigating the menu system utilizes the directional buttons, allowing access to waypoint settings, system configurations, and software updates.
Color-coded alerts signal potential issues, such as low battery or GPS signal loss. The display’s brightness is adjustable for optimal visibility in varying light conditions. Understanding these visual cues is essential for effective operation and troubleshooting.
Pairing the Remote to the Motor
Successfully pairing the i-Pilot remote to your motor establishes communication for control. Begin by ensuring the motor is powered on; On the remote, navigate to the “Pair” or “Connect” option within the settings menu. The motor will enter pairing mode, often indicated by a flashing light.
Follow the on-screen prompts, which may involve entering a unique code or confirming a connection request. A successful pairing is usually confirmed by a solid indicator light on both the remote and the motor. Repeat if the initial attempt fails.
Manual Control Operations
Directly control your motor’s steering and speed using the remote and foot pedal, offering precise adjustments for traditional boating experiences and maneuvers.
Steering and Speed Adjustment
The i-Pilot remote provides intuitive control over steering and speed. Utilize the directional pad on the remote to steer left or right, making gradual or sharp turns as needed. Speed adjustments are managed through dedicated buttons, allowing for incremental increases or decreases.
Foot pedal functionality offers hands-free speed control, enabling convenient adjustments while focusing on other boating tasks. The remote allows for both momentary and continuous speed settings, catering to different boating preferences and situations. Experiment with steering sensitivity settings to fine-tune responsiveness to your specific boating style and conditions.
Foot Pedal Functionality
The i-Pilot system incorporates a foot pedal for convenient, hands-free speed control; Pressing the heel of the pedal decreases speed, while pressing the toe increases it. This allows boaters to maintain focus on steering and surroundings without needing to manipulate the remote.
Foot pedal operation complements both momentary and continuous speed control modes. In momentary mode, speed adjusts only while the pedal is pressed. Continuous mode allows setting a desired speed, maintained until adjusted again. The foot pedal enhances boating convenience and responsiveness, offering a streamlined control experience.

Momentary and Continuous Speed Control
i-Pilot offers two distinct speed control modes: momentary and continuous. Momentary control adjusts speed only while the throttle button on the remote or foot pedal is actively pressed, providing immediate responsiveness for precise maneuvering.
Continuous speed control allows setting a desired speed which the motor maintains until altered. This is ideal for longer stretches of travel where a consistent pace is preferred. Switching between modes provides versatility, adapting to various boating scenarios and user preferences for optimal control and efficiency on the water.
Adjusting Steering Sensitivity
The i-Pilot remote allows users to customize steering sensitivity to match their boating style and conditions. Higher sensitivity settings result in quicker, more responsive steering, beneficial for tight maneuvers or choppy waters. Conversely, lower settings provide smoother, more deliberate steering, ideal for precise course corrections or calmer conditions.
Adjusting this setting ensures optimal control and prevents oversteering. Experimenting with different levels allows boaters to find the perfect balance between responsiveness and stability, enhancing the overall boating experience and ensuring safe, predictable handling.
GPS Motor Control Features
i-Pilot’s GPS features—waypoints, AutoTrack, Spot-Lock, and cruise control—deliver precise navigation and effortless boat control on the water for users.
Waypoint Management
Waypoint management is a core function of the i-Pilot system, enabling users to mark and revisit productive fishing spots or navigate to specific locations with ease. The system allows for setting and storing numerous waypoints, providing a digital map of your favorite boating areas.
Users can easily name and organize these waypoints for quick identification. The i-Pilot remote facilitates straightforward waypoint creation directly on the water, ensuring accurate location marking. Furthermore, the system supports waypoint editing and deletion, allowing for a customized and efficient navigational experience. This feature significantly enhances on-water efficiency and enjoyment.
Setting and Saving Waypoints
Setting and saving waypoints with the i-Pilot system is a simple process. To create a waypoint, navigate to the desired location and utilize the remote control to initiate the waypoint setting function. The system will then record the current GPS coordinates.
Users can assign a descriptive name to each waypoint for easy recall. The i-Pilot remote allows for immediate saving of the waypoint to the system’s memory. Multiple waypoints can be stored, creating a personalized navigational database. Regularly saving key locations ensures quick return to productive fishing spots or important areas.
Navigating to Waypoints
Navigating to saved waypoints with the i-Pilot system is straightforward. From the remote control interface, select the desired waypoint from the stored list. Activate the navigation function, and the i-Pilot motor will automatically steer the boat towards the selected coordinates.
The system provides real-time feedback on the boat’s progress, displaying distance and bearing to the waypoint. Users can monitor the journey and make minor adjustments if needed. This feature allows for precise and efficient travel between frequently visited locations, maximizing time on the water and simplifying boat control.
AutoTrack System – Following a Path
The AutoTrack system enables the i-Pilot to precisely follow a pre-defined path, recorded during a previous journey. To utilize this feature, first record a desired route by driving the boat along the intended course while the system is active.
Once saved, the AutoTrack function allows the motor to autonomously navigate the boat along the recorded path, maintaining a consistent course and speed. This is ideal for repetitive routes, contour following, or simply enjoying a hands-free boating experience, enhancing convenience and precision on the water.
Advanced i-Pilot Functions
Explore advanced features like Co-Pilot, Spot-Lock, and Cruise Control, maximizing your boating experience with precise control and automated functionality.
Co-Pilot Feature – Mirroring Control
The Co-Pilot feature offers a unique capability to mirror steering and speed commands from a second i-Pilot remote. This allows an additional passenger to precisely duplicate the helm’s actions, enhancing collaborative boat control. It’s particularly useful for maneuvering in tight spaces or during complex operations where synchronized input is beneficial.
To activate Co-Pilot, ensure both remotes are paired with the motor. One remote functions as the primary controller, while the second mirrors its inputs. This mirroring provides a seamless and intuitive experience, enabling a second operator to assist with navigation and maintain precise control alongside the primary operator. This feature greatly improves safety and coordination.
Spot-Lock Technology – Maintaining Position
Spot-Lock is a revolutionary GPS-based positioning system that allows your boat to remain stationary in any location, regardless of wind or current. Simply press the Spot-Lock button on the i-Pilot remote, and the motor will automatically engage to hold your position with remarkable accuracy.
This feature is ideal for fishing, waiting for a bridge to open, or any situation where precise positioning is crucial. Spot-Lock utilizes the GPS signal to counteract external forces, ensuring your boat stays put. You can adjust the Spot-Lock radius to fine-tune the area of operation, providing flexibility and control.
Cruise Control – Consistent Speed
Cruise Control enables you to maintain a consistent boat speed without constantly adjusting the throttle. Activate Cruise Control on the i-Pilot remote, and the motor will automatically regulate speed, freeing you to focus on other tasks like fishing or observing your surroundings.
This feature is particularly useful for long stretches of open water where a steady speed is desired. You can easily adjust the set speed up or down using the remote’s controls. Cruise Control provides a smooth and efficient boating experience, conserving fuel and reducing fatigue.
Battery Level Indicator and Management
The i-Pilot remote features a built-in Battery Level Indicator, providing real-time feedback on your trolling motor battery’s remaining charge. This crucial information helps prevent unexpected power loss during your outing, ensuring you can return to shore safely. The indicator displays the battery level as a percentage or with a graphical representation.
Effective battery management is vital for maximizing the lifespan and performance of your trolling motor. Monitor the indicator regularly and adjust your speed or usage accordingly to conserve power. Consider carrying a spare battery for extended trips.

Troubleshooting Common Issues
This section addresses frequent problems like unresponsive remotes, GPS signal loss, and motor failures, offering solutions and error code explanations for swift resolution.
Remote Control Not Responding
If the i-Pilot remote isn’t responding, begin by verifying the battery level; low batteries are a common cause. Ensure the remote is powered on and within range of the i-Pilot module. Attempt to re-pair the remote with the motor following the instructions in the ‘Pairing the Remote to the Motor’ section.
Check for any obstructions that might interfere with the signal. If the issue persists, try resetting the remote by removing and reinserting the batteries. A full system reset of the i-Pilot module might also be necessary, consulting the full manual for detailed steps. Contact Minn Kota support at 1-800-227-6433 if problems continue.
GPS Signal Loss
Experiencing GPS signal loss can disrupt i-Pilot functionality. Verify a clear view of the sky, as obstructions like tall buildings, dense trees, or even heavy cloud cover can interfere with the signal. Ensure the antenna is correctly installed and positioned, as detailed in the ‘Antenna Installation and Positioning’ section.
Confirm the i-Pilot module has a secure connection. Cycle the power to both the motor and the remote control. If signal loss continues in open areas, a potential issue with the GPS module itself may exist, requiring contact with Minn Kota technical service at 1-800-227-6433.
Motor Not Engaging
If the motor fails to engage despite proper remote control operation, first verify the battery is fully charged and securely connected. Inspect the motor’s wiring harness for any loose connections or damage. Confirm the propeller is free from obstructions like weeds or fishing line.
Check the motor’s thermal overload protection; it may have tripped if the motor was recently used extensively. If the issue persists, consult the ‘Troubleshooting’ section for error codes or contact Minn Kota’s technical support at 1-800-227-6433 for further assistance.
Error Messages and Codes
The i-Pilot system utilizes error messages displayed on the remote control to diagnose potential issues. These codes provide valuable insight into the problem, ranging from low voltage to GPS signal interference. Refer to the complete list of error codes within this manual or on the Minn Kota website (minnkotamotors.com) for detailed explanations.
Understanding these codes allows for quicker troubleshooting. If an unfamiliar error appears, record the code and contact Minn Kota’s technical support at 1-800-227-6433 for expert guidance and resolution.
Maintenance and Care
Regular cleaning, proper storage, and timely battery replacement ensure the longevity and reliable performance of your i-Pilot remote control system.
Cleaning the Remote Control
To maintain optimal performance and extend the life of your i-Pilot remote, regular cleaning is essential. Always power off the remote before cleaning and remove the batteries to prevent accidental activation. Use a mild, non-abrasive soap and a damp cloth to gently wipe down the exterior surfaces.
Avoid harsh chemicals or solvents, as these can damage the plastic casing and electronic components. Pay particular attention to cleaning around the buttons and display screen, ensuring no dirt or debris accumulates. After cleaning, thoroughly dry the remote with a soft cloth before reinserting the batteries and powering it on.
Do not submerge the remote in water, even though it is designed for marine use; cleaning should be limited to surface wiping.
Winter Storage Procedures
Proper winter storage is crucial for preserving your i-Pilot system’s functionality. Before long-term storage, thoroughly clean the remote control as detailed in the maintenance section. Remove the batteries from both the remote and the i-Pilot module to prevent corrosion from battery leakage during inactivity.
Store the remote in a dry, climate-controlled environment, away from direct sunlight and extreme temperatures. Avoid storing it in locations prone to moisture or freezing conditions. Disconnect the i-Pilot module from the motor and store it in a similar dry location. Inspect all connections for corrosion before storing, and consider applying a dielectric grease for added protection.
Battery Replacement
To replace the batteries in your i-Pilot remote, locate the battery compartment, typically on the back of the unit. Use the correct battery type as specified in the manual – typically AAA alkaline batteries are required. Ensure proper polarity when inserting new batteries, matching the positive (+) and negative (-) markings.
Always replace all batteries at the same time to maintain consistent performance and prevent potential issues. After replacing the batteries, power on the remote to verify it is functioning correctly. Dispose of used batteries responsibly, following local regulations for battery recycling. Regularly check battery levels for optimal operation.
Software Updates and Firmware
Maintaining up-to-date software and firmware is crucial for optimal i-Pilot performance and access to the latest features. Regularly check the Minn Kota website (minnkotamotors.com) for available updates. Download the latest firmware and follow the provided instructions carefully for installation.
Typically, updates involve connecting the i-Pilot module to a computer via USB. Ensure a stable connection during the update process to prevent data corruption. Software updates can enhance functionality, improve GPS accuracy, and address potential bugs. Ignoring updates may limit performance and compatibility.


About the author